Last updated: August 15, 2026
Ask in any gardening forum whether the Kratky method works for tomatoes and you will get two confident answers: “absolutely not, tomatoes drink too much” and “here is a photo of my bucket tomato covered in fruit.” Both camps are describing something real. Tomatoes are the hard mode of passive hydroponics, and they are also one of the most satisfying crops to pull off in a system with no pump, no electricity, and no moving parts.
The difference between the two outcomes is almost never luck. It comes down to variety choice, container size, nutrient strength, and whether you are willing to top up the reservoir once the plant hits its thirsty stage. This guide walks through the whole build, then covers the adjustments that separate a bucket of ripe fruit from a wilted disappointment.
This article contains affiliate links. If you buy through them, we may earn a commission at no extra cost to you. Learn more.
Quick Answer
Can you grow tomatoes with the Kratky method?
- Yes, but pick a compact determinate or dwarf variety and give it a 5-gallon or larger container; a mason jar will not carry a tomato to harvest.
- Plan to top up the reservoir once flowering starts. A fruiting tomato can empty a bucket in days, which makes strict set-and-forget Kratky unrealistic for this crop.
- Indoors, tomatoes also need strong light, commonly 14 to 16 hours a day under a capable LED panel, or they grow leggy and refuse to set much fruit.
Kratky Tomatoes Step by Step
The short version: one seedling, one lidded 5-gallon bucket, full-strength nutrient solution, and an air gap that grows as the plant drinks. Here is the full sequence experienced growers generally follow.
- Choose a compact variety. Dwarf and determinate tomatoes such as Tiny Tim, Red Robin, or a patio-type bush tomato stay manageable and fruit on a schedule. Sprawling indeterminate beefsteaks can work outdoors with constant topping up, but they overwhelm a passive setup fast.
- Pick the container. A food-safe 5-gallon bucket with a lid is the classic choice. Opaque matters: light reaching the solution feeds algae. Cut or drill a hole in the lid for a net pot, commonly in the 3 to 5 inch range for tomatoes.
- Start the seedling separately. Germinate in a starter plug or rockwool cube, then move it into the net pot with clay pebbles once roots poke out. Tomatoes typically germinate in around 5 to 10 days.
- Mix the solution. Use a complete hydroponic formula suited to fruiting crops. Most growers target a pH of roughly 5.5 to 6.5 and an EC around 2.0 to 2.5 for young plants, drifting toward 2.5 to 3.5 as fruit develops. Our guide to the best nutrients for the Kratky method covers formulas that dissolve cleanly in still water.
- Set the starting level. Fill so the bottom quarter to third of the net pot sits in solution. The seedling wicks moisture up while the upper roots stay in air.
- Give it serious light. Outdoors, full sun. Indoors, tomatoes are among the hungriest common crops; many growers run LED panels 14 to 16 hours a day, hung roughly 12 to 24 inches above the canopy depending on wattage. See our guide to the best grow light for tomatoes indoors.
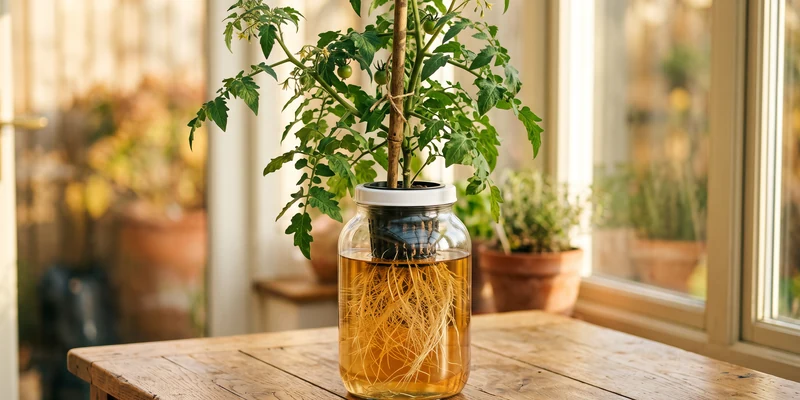
- Let the air gap form. As the plant drinks, the falling water level exposes upper roots to humid air. That air gap is the entire oxygen supply in Kratky, so never refill to the brim.
- Top up below the root line. Once flowering starts, check weekly at minimum. Add solution only up to a level that keeps a generous air gap, commonly leaving the top few inches of roots exposed.
- Support and prune. Even a dwarf plant loaded with fruit gets top heavy. A small stake or cage anchored through the lid keeps the bucket from becoming a sail.
- Harvest. From transplant, compact varieties typically ripen their first fruit in around 60 to 80 days, depending on variety, light, and temperature.
Step two is the one purchase worth getting right. A bucket lid with the net pot opening already cut saves the hole saw and gives a snug, light-blocking fit around the plant, which is exactly what a passive reservoir needs.

Why Tomatoes Are the Hard Mode of Kratky
Kratky was popularized with lettuce for a reason: a lettuce head finishes its whole life on the water a container starts with. A tomato does not. It lives for months, builds a large canopy, and transpires heavily in warm weather, so the math of a fixed reservoir stops working somewhere around flowering. That is not a flaw in your build, it is the crop.
The second complication is appetite. Tomatoes want a stronger, more potassium-rich solution as fruit sets, while leafy greens are content with one mild mix from start to finish. In a passive system you cannot circulate or rebalance easily, so growers compensate by mixing fresh, correctly balanced solution at every top-up. If the chemistry side is new to you, start with our plain-English overview of hydroponic nutrients for tomatoes.
The mix most passive tomato growers settle on is the MasterBlend tomato formula combination: 4-18-38 with calcium nitrate and magnesium sulfate, weighed out fresh at every top-up so the fruiting stage gets the potassium it wants.

The air gap is not optional
Roots submerged in still water with no exposed section will suffocate, and suffocating roots are the open door for root rot. The rule of thumb experienced growers repeat: after the seedling stage, roughly the top third of the root mass should hang in air. If you top up, top up to below that line, never over it.
Pure Kratky or Topped-Up Kratky?
Strictly speaking, the original method means no additions at all: fill once, harvest when the water runs out. For lettuce that works beautifully. For tomatoes, a purist run in a 5-gallon bucket usually ends with a stressed plant and a modest handful of fruit, because the reservoir empties long before the plant is done.
Most successful tomato growers therefore run what gets called modified Kratky: the same passive bucket, no pump, but fresh solution added every week or two once fruit sets. You keep the simplicity and silence, and you lose only the bragging rights of never lifting the lid. If you would rather add an air pump and stop worrying about levels entirely, that is deep water culture, and our DWC vs Kratky comparison lays out exactly where that trade pays off.
Common Mistakes to Avoid
- Starting in a jar. Mason jars are wonderful for herbs and lettuce, not for a crop that can drink quarts per day in summer. Five gallons is the sensible floor for tomatoes.
- Refilling to the brim. Drowning the whole root mass removes the air gap that keeps roots breathing. Always leave several inches of exposed root.
- Weak light indoors. A windowsill or a small clip-on lamp grows a leggy plant with few flowers. Fruiting crops need real output, delivered consistently on a timer.
- Letting light hit the solution. A translucent container turns green with algae, which competes for nutrients and clogs roots. Go opaque, or wrap the container.
- Choosing a giant variety. An indeterminate vine wants constant water, heavy support, and months of maintenance. Compact varieties are bred for exactly this kind of container life.
- Ignoring heat. Small reservoirs warm up quickly, and warm, still water holds less oxygen. Keep buckets out of direct afternoon sun where possible.
Where to Go From Here
If this is your first passive build, it is worth reading the fundamentals in our complete Kratky method guide first, then treating tomatoes as your second or third project after a head of lettuce has taught you how the air gap behaves. If you are already comparing crops, our overview of the best plants for the Kratky method ranks tomatoes honestly against easier wins.
And if you decide you want a dedicated, pump-fed setup for serious tomato production, our roundup of the best hydroponic system for tomatoes covers the options that handle heavy feeders without weekly bucket lifting.
Frequently Asked Questions
Can you really grow tomatoes with the Kratky method? Yes. Compact determinate and dwarf varieties in 5-gallon or larger containers regularly produce respectable harvests. The method’s set-and-forget reputation does not survive contact with a fruiting tomato, though: plan on topping up.
Do I have to top up the reservoir? For anything beyond a small dwarf plant, almost certainly. Once flowering starts, a healthy tomato can empty a bucket in days during warm weather. Top up with fresh, full-strength solution, keeping the upper roots exposed to air.
What size container do Kratky tomatoes need? Five gallons per plant is the common minimum, and larger is more forgiving. Bigger reservoirs buffer temperature swings, nutrient drift, and your vacation schedule.
What EC and pH should I run for tomatoes? Most growers hold pH around 5.5 to 6.5 and run EC roughly 2.0 to 2.5 for young plants, rising toward 2.5 to 3.5 in fruiting. Treat these as starting ranges, not laws, and adjust to what the plant shows you.
How long until harvest? From transplant, compact varieties typically ripen first fruit in around 60 to 80 days. Light is the biggest lever indoors: more consistent, stronger light generally means earlier and heavier fruit set.
Why are my leaves yellowing or curling? Common suspects are solution that has drifted too strong or too weak, roots sitting fully submerged with no air gap, or heat stress in a small dark bucket in the sun. Check the water level and mix fresh solution before assuming disease.
The Bottom Line
Kratky tomatoes work when you respect what the crop is: a long-lived, thirsty, heavy feeder in a system designed around simplicity. Choose a dwarf or determinate variety, start with at least five gallons, keep an air gap at all times, and accept that topping up is part of the deal. Do that, and a bucket with no pump will hand you ripe tomatoes.