Last updated: August 13, 2026
The Kratky method is hydroponics with the plug pulled out: no pump, no electricity, no moving parts, and in its purest form no maintenance between planting and harvest. You fill a container with nutrient solution once, suspend a seedling above it, and walk away while the plant manages the rest.
It sounds too easy to be real, which is why it helps to know the method comes from horticultural researcher B.A. Kratky at the University of Hawaii, who published it as a legitimate low-cost growing technique. The trick is a clever piece of plant biology involving an air gap, and once you understand it, you can grow lettuce in anything from a mason jar to a storage tote. This guide explains how it works, how to set one up, and where the method’s honest limits sit.
This article contains affiliate links. If you buy through them, we may earn a commission at no extra cost to you. Learn more.
Quick Answer
What is the Kratky method?
- A passive hydroponic technique: a container is filled with nutrient solution once, and as the plant drinks, the falling water level creates a moist air gap where roots absorb oxygen.
- No pump or electricity is needed, because the air gap does the job an air pump does in DWC.
- It excels with lettuce, greens, and herbs on a single fill; fruiting crops work but need larger containers and top-ups managed with care.
How the Kratky Method Works
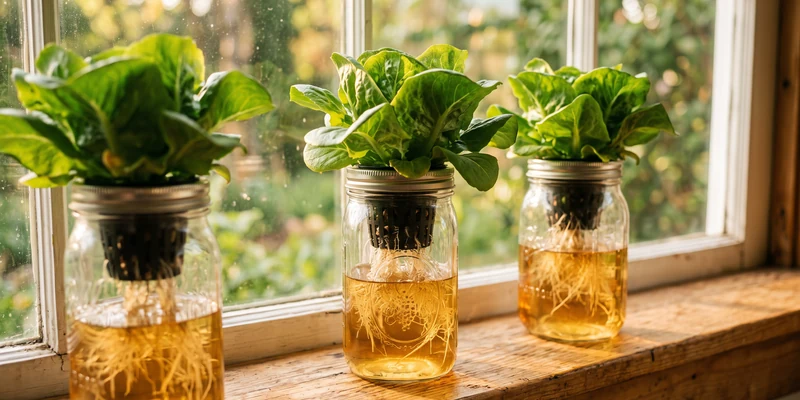
The method runs on a self-regulating loop: the plant drinks, the water level falls, and the space left behind becomes a humid air chamber. Roots respond by differentiating: the lower roots keep drinking from the solution, while roots in the gap adapt to absorb oxygen from the moist air. The plant effectively builds its own aeration system as it grows.
| Stage | What is happening | Your job |
|---|---|---|
| Day 0: setup | Container full, solution touches the net pot, seedling wicks moisture | Fill, plant, position, done |
| Weeks 1 to 2 | Roots reach into solution, level starts dropping | Nothing, resist fiddling |
| Weeks 3 to 5 | Air gap widens, air roots develop, growth accelerates | Nothing, watch the level |
| Harvest | Solution nearly gone as the plant matures | Harvest, dump dregs, clean, restart |
The timing is the elegant part: sized correctly, the container runs out of solution at roughly the same time the crop reaches harvest size. For lettuce, growers generally allow around one gallon of solution per head, which carries a plant from transplant to a full head in about five to seven weeks with no refills at all.
The Air Gap Rule: Why You Never Refill to the Top
The most important rule in Kratky growing is counterintuitive: once roots have grown in, never refill the container to the brim. The air gap is not empty space, it is the plant’s lungs. Submerging the adapted air roots again cuts off their oxygen supply and can set the plant back badly or drown it outright.
At setup, the solution should just touch the bottom of the net pot so the seedling can wick moisture while its roots reach down. From that point the level only moves one direction. If a big crop genuinely needs more water late in the run, add it carefully so a generous gap remains, filling perhaps to a third or half of the container, never over the upper roots. This is also the cleanest dividing line between Kratky and deep water culture: DWC keeps roots submerged and bubbles oxygen in with a pump, while Kratky lets the falling level create the oxygen zone passively. Our DWC vs Kratky comparison weighs the two head to head.
Setting Up Your First Kratky Container
A Kratky build is a five-item shopping list: an opaque container, a lid with a net pot hole, clay pebbles or a grow sponge, hydroponic nutrients, and a seedling. Wide-mouth mason jars, dark buckets, and storage totes all work, which is why the method is famous for costing almost nothing to try; our Kratky mason jar guide covers the smallest version.
The one item most kitchens do not already have is the net pot, which holds the plant and its medium above the solution. They come in multipacks, and the 2 and 3 inch sizes cover jars and small lids while 5 inch pots suit bucket builds.

- Block the light. Paint, wrap, or choose dark containers. Light plus nutrient solution equals algae, and algae competes with your plant.
- Mix the solution. Use a complete hydroponic fertilizer at label strength and adjust pH to around 5.5 to 6.5. Complete means hydroponic-specific; see our guide to the best nutrients for the Kratky method.
- Fill to the net pot. The solution should barely touch the pot’s base, wetting the pebbles or sponge from below.
- Plant and place. Set a started seedling in the net pot, then give the container bright light: a sunny window works, and a modest LED grow light is more consistent indoors.
- Leave it alone. Check weekly at most. The method fails more often from fiddling than from neglect.
For step two, the dry MasterBlend combination, 4-18-38 paired with calcium nitrate and magnesium sulfate, is the mix passive growers reach for most often: it dissolves cleanly in still water and stores as a powder between grows.

What Grows Well, and What Fights You
Kratky’s sweet spot is any crop that matures in one container of water: lettuce above all, plus bok choy, spinach, arugula, kale for baby leaves, and most soft herbs. Basil thrives, though it outlives its water and appreciates a careful top-up mid-run. Our walkthrough on Kratky lettuce from seed to harvest is the ideal first project.
Fruiting crops are the advanced class. A tomato or cucumber drinks many times its setup volume, so a jar or small bucket cannot carry it to harvest; growers use large totes and accept that top-ups, done below the air roots, become part of the routine. It works, as our Kratky tomatoes guide shows, but at that point the method loses some of its walk-away magic. Root vegetables and anything needing months of heavy feeding are better served elsewhere. For the full crop-by-crop rundown, see the best plants for the Kratky method.
Kratky Strengths and Honest Limits
The strengths are obvious: zero electricity, zero noise, near-zero cost, and immunity to power outages that can wreck a pumped system. It is also the best teaching tool in hydroponics, because nothing is hidden behind equipment.
The limits deserve equal billing. There is no thermostat on the system: in hot rooms the small water volume warms up, holds less oxygen, and invites root problems late in the run. There is no mid-course correction either, since the nutrient balance you mix on day one is the balance the plant lives with, which is why single-fill crops like lettuce suit it best. And scale cuts both ways: a shelf of jars is charming, but at greenhouse scale, refilling and sanitizing containers one by one is real labor. For growers who want the same simplicity with more control, a bubbling upgrade path is natural: the deep water culture guide shows what adding one air pump unlocks.
Common Mistakes to Avoid
- Topping the container back up to the brim. The classic Kratky killer. The air gap is functional; protect it.
- Clear jars in full sun. Algae green within a week. Wrap or paint anything transparent.
- Starting with too little water for the crop. A quart jar cannot finish a full lettuce head. Match container volume to the plant, about a gallon per lettuce.
- Using incomplete fertilizer. General-purpose soil feeds lack nutrients that soil normally supplies. Hydroponic formulas only.
- Planting seeds directly into a full setup. Start seedlings separately in sponges or cubes, then transplant. Germination on top of a cold reservoir is slow and patchy.
- Parking it in a hot window. Bright light, yes; cooking the reservoir, no. Warm solution late in the run is the method’s weakest moment.
Frequently Asked Questions
Does the Kratky method really need no electricity at all? Correct, none, if you have a bright window. Indoors without good sun, a small LED grow light is the one plug most Kratky growers use, and the growing method itself still runs passively.
How long does Kratky lettuce take? Typically around five to seven weeks from transplant to a harvestable head, depending on variety, light, and temperature. Baby leaf harvests start weeks earlier.
Do I ever add water in the Kratky method? For lettuce and greens sized correctly, no, one fill carries the crop. For long-lived or fruiting plants, careful top-ups are allowed, always leaving the air gap and air roots uncovered.
Why are the top roots of my Kratky plant dry looking? Those are air roots, and they are supposed to look different: fuzzier and drier than the submerged ones. They are absorbing oxygen in the gap, which is the method working as designed.
Kratky or DWC for a beginner? Kratky to learn the biology and harvest a first lettuce for pennies; DWC when you want faster growth, bigger plants, and the ability to adjust the reservoir mid-crop.
The Bottom Line
The Kratky method grows real vegetables with nothing but a container, nutrient solution, and patience: fill once, plant once, and let the falling water level build the air gap that keeps roots breathing. Respect the one rule, never refill over the air roots, size about a gallon of solution per lettuce head, and keep containers dark and cool. It is the cheapest ticket into hydroponics, and for greens it is arguably the best one.