Last updated: August 15, 2026
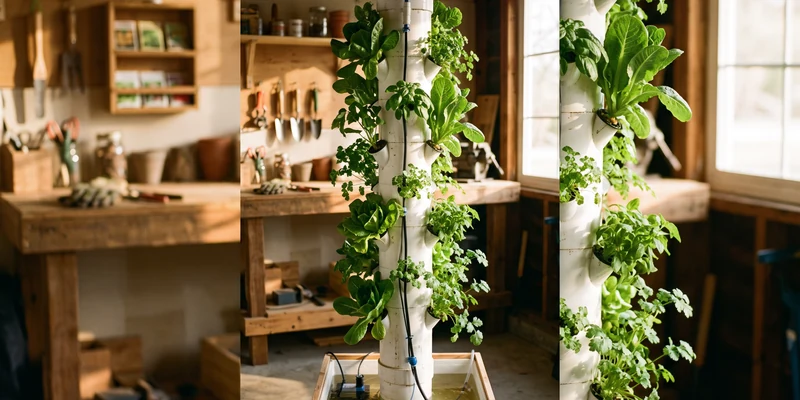
A vertical tower is the space-saving trick of hydroponics: twenty or more plants growing in the footprint of a single bucket. Commercial versions are sleek and expensive, which is exactly why the DIY hydroponic tower garden has become one of the most popular weekend builds in home growing. The core of it is almost comically simple: a fence post or large PVC pipe standing in a bucket, holes cut at an angle for net pots, and a small pump pushing nutrient solution to the top so it can trickle back down over the roots.
This guide walks through the classic build step by step: the parts list, the cuts, the pump loop, and the details that decide whether your tower thrives or drips on the floor. Basic tools and a free afternoon are genuinely enough.
This article contains affiliate links. If you buy through them, we may earn a commission at no extra cost to you. Learn more.
Quick Answer
How do you build a DIY hydroponic tower?
- Stand a 3 to 4 inch PVC pipe or 4×4 inch vinyl fence post upright in a lidded 5-gallon bucket that serves as the reservoir.
- Cut angled planting holes down the sides for 2-inch net pots, then run a small submersible pump up through the center to drip solution from the top.
- The solution trickles down over the roots inside the tower and drains straight back into the bucket, a loop that waters every plant continuously.
The Build, Step by Step
Here is the complete sequence. Read it once before cutting anything; the order matters less than understanding the loop you are building: bucket, pump, top of tower, gravity, bucket again.
- Gather the parts. You need a 4 to 6 foot length of 3 or 4 inch PVC pipe or a 4×4 inch vinyl fence post, a 5-gallon bucket with lid, a small submersible fountain pump (commonly in the 100 to 250 gallon-per-hour class for a single tower), flexible tubing to fit the pump outlet, a couple dozen 2-inch net pots, a PVC end cap for the top, and aquarium-safe sealant. A hole saw matching your net pot lip diameter saves enormous frustration.
- Cut the planting holes. Mark holes in vertical rows down the pipe, commonly 3 or 4 rows spaced evenly around it, with 6 to 8 inches between holes in each row. Cut each hole with the hole saw, then heat the plastic gently with a heat gun and press an angled lip inward, or install pre-made planting cups, so each net pot sits tilted upward at roughly 30 to 45 degrees. The tilt is what keeps pots, medium, and water inside the tower.
- Cut the lid opening. Trace the pipe’s outline on the bucket lid and cut the opening so the tower slides through snugly and stands on the bucket floor, or rests supported just above it. A snug lid keeps light out of the reservoir, which is your main defense against algae.
- Install the pump loop. Place the pump on the bucket floor and run its tubing up through the inside of the tower to the top. At the top, fit a small shower head, a drip ring, or simply a capped tee with holes drilled in it, so solution spreads across the tower’s inner walls instead of firing a single jet down the middle.
- Cap the top. A loose PVC cap over the tower top keeps light and debris out while staying removable for maintenance. Drill the cap to pass the tubing if your design routes it outside.
- Test with plain water. Fill the bucket, plug in the pump, and watch for ten minutes. You are looking for full coverage of the inner walls, steady drainage back to the bucket, and, critically, no leaks at the lid. Fix leaks now with sealant, not after there are plants in the holes.
- Plant it up. Start seedlings in starter plugs, then set them in the net pots, with or without clay pebbles as ballast. Leafy greens, herbs, and strawberries are the classic tower crops; big fruiting plants get top-heavy fast.
- Mix and manage the solution. Fill the reservoir with a complete hydroponic mix, commonly at a mild strength for greens, with pH around 5.5 to 6.5. Check the level every few days: a tower’s constant trickle evaporates more water than a sealed bucket.
- Set the pump schedule. Many growers run the pump on a timer, for example 15 minutes on and 30 to 45 minutes off, while others run it continuously. Roots inside the humid tower tolerate both; a timer saves electricity and pump wear.
- Add light if indoors. A tower is tall and cylindrical, which flat panels serve poorly. Indoor builders typically hang vertical strip lights alongside the tower, or rotate the tower regularly under a corner-mounted light.
One safety note worth taking seriously: the pump is an electrical device sitting in water, so plug it into a GFCI-protected outlet and leave a drip loop in the cord below the plug.
Of everything on the parts list, the pump is the piece to buy on specification rather than on price, because it has to lift solution the full height of the tower and then keep doing it every day.

Parts and Choices That Decide the Result
Most tower failures trace back to three choices made before the first cut: the pipe, the pump, and the holes. Get these right and the rest is assembly.
| Choice | What experienced builders do |
|---|---|
| Pipe or post | 4-inch PVC is the classic; 4×4 vinyl fence post gives flat faces that are easier to cut and seal. Both want food-contact-safe, uPVC-type plastic, never old pipe of unknown history |
| Tower height | 4 to 6 feet standing in the bucket; taller towers need a stronger pump and a wall anchor for stability |
| Pump size | A head height rating that exceeds your tower height with margin; check the pump’s max lift, not just flow |
| Hole angle | Roughly 30 to 45 degrees upward tilt so solution stays inside and plants grow outward |
| Net pots | 2-inch pots suit greens and herbs; our net pots guide covers sizes and lip styles |
| Reservoir | 5-gallon bucket minimum; a tote supports taller towers and buffers heat and evaporation better |
If you want the theory behind why this design works, it is essentially a vertical cousin of the nutrient film approach: a thin moving film of solution over bare roots, explained in our guide to NFT hydroponic systems.
Net pots are the one part you buy by the handful rather than one at a time, since a single tower swallows twenty or more of them.

Running the Tower Well
A tower is a low-maintenance system once dialed in, but it concentrates all its risk in one component: the pump. If it stops, the roots inside the tower start drying within hours, faster than in any bucket system, because they hang in air by design. Check the intake screen for debris when you top up, and keep a cheap spare pump on the shelf.
If you would rather cycle the pump than run it continuously, a repeat cycle outlet timer handles the on and off intervals for you.

Nutrient management is standard hydroponics with one twist: the constant trickling aerates the solution well, but it also drives evaporation, so concentration creeps up between top-ups. Topping up with plain water and re-checking strength every week or so keeps it honest. If mixing solutions is new territory, start with our plain-English overview of hydroponic nutrients, and use clay pebbles as ballast in windy spots; our guide to clay pebbles in hydroponics explains their role.
Indoor towers and light
Outdoors, the sun walks around your tower for free. Indoors, you have to engineer that: vertical strip fixtures hung parallel to the tower on two or three sides work far better than one flat panel aimed at a cylinder. Many growers keep lights roughly 6 to 12 inches from the canopy and run them 12 to 16 hours a day for greens. Our roundup of the best LED grow lights for indoor plants includes strip options suited to vertical setups.
Common Mistakes to Avoid
- Cutting holes straight instead of angled. Straight holes shed water, medium, and eventually plants. The upward tilt is the design.
- Buying a pump on flow rate alone. A pump rated for high flow at zero height can still fail to reach a 5-foot tower top. Check max head height with margin.
- Skipping the plain-water test. Every builder who skips it finds the leak after planting. Ten minutes of testing saves a wet floor.
- Letting light into the loop. Translucent parts, gaps at the lid, or an open tower top all grow algae. Seal the light out everywhere solution flows.
- Planting heavy crops up high. A fruiting tomato at chest height turns the tower into a lever. Keep towers for greens, herbs, and strawberries, and put anything heavier at the bottom.
- Forgetting winter reality indoors. A tower next to a cold window chills the trickling solution below what warm-season crops enjoy. Room placement matters.
Frequently Asked Questions
How many plants fit on a DIY tower? A 5-foot tower with 3 or 4 rows and 6 to 8 inch spacing typically carries 18 to 28 net pots. Fewer, wider-spaced holes suit bushier crops like basil; tighter spacing suits lettuce.
Do I need a timer for the pump? No, but many growers use one. Cycles like 15 minutes on and 30 to 45 minutes off keep roots wet while saving electricity and pump wear. Continuous running also works; the humid tower interior protects roots between passes either way.
Is PVC safe for growing food? Rigid uPVC pipe sold for potable water is the common choice among builders. Avoid pipe of unknown origin, flexible PVC, and anything previously used for chemicals, and let fresh cuts and cement cure fully before introducing plants.
Can I run a tower without a pump, Kratky style? Not really. The tower’s roots hang in air and depend on the trickle for water. Passive methods need the reservoir at the roots, which is a different design.
What grows best in a tower garden? Lettuce, other leafy greens, herbs, and strawberries are the reliable core. They are light, shallow-rooted, and happy with the constant film of solution the tower provides.
The Bottom Line
A DIY hydroponic tower is a bucket, a pipe, a pump, and some deliberate holes, and that modest parts list grows twenty-plus plants in one square foot. Angle the holes, size the pump for the height, test with plain water, and keep light out of the loop. Do those four things and the build rewards you for seasons.